HomeLab Revamp Network -- Revised Plan & Diagrams
20 Apr 2025I recently built out our new minilab hardware cluster. After several 3D prints, I’m not 100% satisfied with it, but it’s good enough to start provisioning.
I ran into a few issues: there really isn’t a standard for minilabs yet—though two prevailing widths seem to dominate: 10 inch and 10.5 inch. If you’re diving into this, be aware! Jeff Geerling recently started an excellent collection of resources: Project mini Rack. If I’d started with that, I wouldn’t have run into the same problems.
This led to a problem: my MikroTik switch is a few mm too large to fit in the DeskPi T2. I have a few ideas—maybe more 3D printing, or even some basic woodworking to attach it to a case—but I haven’t decided on a final path. Honestly, I have enough space for a 6-8U 19-inch rack on the wall next to my current rack, and long term I may just do that.
It also seems pineboard.io has gone out of business, so my original plan to use their NVMe + PoE hat may not be possible. For now, I’ve implemented some of the awesome new GaN-based USB-C power supplies, precariously mounted on mini shelves, to power everything in the rack. (You should research GaN PD—these can renegotiate when new devices initially draw power, which might lead to issues down the line. But it’s a home lab, and I’m hyped on GaN & Navitas as a company, so I’m doing it anyways!)
Enough lamentations—here’s a picture of the in-progress build we’re starting with:

Once everything is finalized, I’ll take a better photo and post more info on where I landed with the final setup.
For now, here are the 3D printed resources I’ve landed on for the DeskPi T2:
- USW-Flex-2.5G-8-POE 10-inch rack mount (1x)
- Raspberry Pi 3B/4B/5B 10-inch rack mount (2x)
- Ubiquiti UniFi USW-Flex-Mini 10-inch rack mount (1x)
- Minisforum MS-01 2U rack mount 10-19 with fan keys (2x)
Here is the finalized implementation plan, and diagram of my network:
Kubernetes Network Infrastructure Implementation Plan
1. Network Device Standardization
Network Equipment Naming & IP Assignment
| Current Name | Current IP | New Name | New Static IP | Model |
|---|---|---|---|---|
| Usw-flex-2.5-k8s-main | 10.0.1.215 | USW-Flex-2.5G-K8s-Main | 10.0.1.80 | Ubiquiti Networks Flex 2.5G (USW-Flex-2.5G-8) |
| Use-flex-k8s-control | 10.0.1.226 | USW-Flex-Mini-K8s-Control | 10.0.1.81 | Ubiquiti UniFi Flex Mini |
| New Device | N/A | MikroTik-CRS309-K8s-Storage | 10.0.1.82 | MikroTik CRS309-1G-8S+ |
| USW-Flex-Printer | 10.0.1.204 | USW-Flex-Printer | 10.0.1.204 | Ubiquiti USW-Flex |
| U6-Enterprise-LivingArea | 10.0.1.207 | U6-Enterprise-LivingArea | 10.0.1.207 | Ubiquiti U6 Enterprise |
| USW-Flex-Media | 10.0.1.208 | USW-Flex-Media | 10.0.1.208 | Ubiquiti USW-Flex |
| USW-Flex-SimRoom | 10.0.1.212 | USW-Flex-SimRoom | 10.0.1.212 | Ubiquiti USW-Flex |
| U6-Enterprise-IW-Upstairs-Living | 10.0.1.227 | U6-Enterprise-IW-Upstairs-Living | 10.0.1.227 | Ubiquiti U6 Enterprise In-Wall |
| Enterprise 24 PoE - Main | 10.0.1.239 | Enterprise-24-PoE-Main | 10.0.1.239 | Unifi Enterprise 24 Port PoE |
| USW-Enterprise-8-PoE-Server | 10.0.1.238 | USW-Enterprise-8-PoE-Server | 10.0.1.238 | Ubiquiti USW Enterprise 8 PoE |
| U6-Lite-Game | 10.0.1.242 | U6-Lite-Game | 10.0.1.242 | Ubiquiti U6 Lite |
| UDM-PRO | 10.0.1.1 | UDM-PRO | 10.0.1.1 | Ubiquiti Dream Machine Pro |
| New Virtual Device | N/A | Vault-Backup-Unraid | 10.0.1.110 | VM/Container on Unraid |
K8s Node Integration
| Current Device | Current IP | Role in New Design | New Management IP | New Control Plane IP | vPro Management IP |
|---|---|---|---|---|---|
| k8s-admin | 10.0.1.223 | K8s-Admin-Box | 10.8.16.85 | 10.8.18.85 (tagged) | N/A |
| k8s-cp-02 | 10.0.1.229 | K8s-CP-02 | 10.8.16.87 | 10.8.18.87 (tagged) | N/A |
| k8s-cp-03 | 10.0.1.245 | K8s-CP-03 | 10.8.16.88 | 10.8.18.88 (tagged) | N/A |
| New Node | N/A | K8s-CP-01 | 10.8.16.86 | 10.8.18.86 (tagged) | N/A |
| New Node | N/A | K8s-MS-01-Node-1 | 10.8.16.90 | 10.8.18.90 (tagged) | 10.8.16.190 |
| New Node | N/A | K8s-MS-01-Node-2 | 10.8.16.91 | 10.8.18.91 (tagged) | 10.8.16.191 |
2. VLAN Structure
Network Segmentation Plan
| VLAN ID | Name | Subnet | Gateway | Purpose |
|---|---|---|---|---|
| 1 | Default | 10.0.1.0/24 | 10.0.1.1 | Network Management |
| 2 | IoT | 10.0.2.0/24 | 10.0.2.1 | Smart Home Devices |
| 3 | Family | 10.0.3.0/24 | 10.0.3.1 | Personal Devices |
| 4 | Work-Devices | 10.0.4.0/24 | 10.0.4.1 | Work Equipment |
| 5 | Unifi-Protect | 10.0.5.0/24 | 10.0.5.1 | Security Cameras |
| 6 | Reverse-Proxy | 10.6.6.0/24 | 10.6.6.1 | External Access |
| 10 | Public-Services | 10.10.10.0/24 | 10.10.10.1 | Media & Shared Resources |
| 16 | K8s-Management | 10.8.16.0/27 | 10.8.16.1 | Kubernetes Management |
| 18 | K8s-Control-Plane | 10.8.18.0/27 | 10.8.18.1 | API Server, etcd |
| 28 | K8s-Pod-Network | 10.8.28.0/23 | 10.8.28.1 | Container Traffic |
| 38 | K8s-Service-Network | 10.8.38.0/26 | 10.8.38.1 | Service Discovery |
| 48 | K8s-Storage-Network | 10.8.48.0/27 | 10.8.48.1 | Ceph Storage Traffic |
| 58 | K8s-LoadBalancer | 10.8.58.0/27 | 10.8.58.1 | External Service Access |
3. Implementation Phases
Phase 0: Automation & Security Infrastructure Setup
-
Basic Network Connectivity Setup
- Configure basic network access to K8s-Admin-Box (10.0.1.223)
- Ensure reliable SSH access for subsequent automation tasks
- Create backup of current network configurations
- Document pre-implementation state for rollback purposes
-
Ansible Configuration Management Setup
- Install Ansible on K8s-Admin-Box (10.0.1.223)
- Create Ansible directory structure:
/opt/ansible/ ├── inventory/ │ ├── hosts.yml │ └── group_vars/ ├── playbooks/ │ ├── network/ │ ├── kubernetes/ │ └── verification/ ├── roles/ │ ├── unifi/ │ ├── mikrotik/ │ └── kubernetes/ └── ansible.cfg - Configure Ansible inventory with network device groups:
- unifi_devices
- mikrotik_devices
- kubernetes_nodes
- control_plane_nodes
- worker_nodes
- Create UniFi API integration roles and playbooks
- Create MikroTik API integration roles and playbooks
- Create Kubernetes node configuration roles and playbooks
-
Secrets Management Implementation
- Primary Vault Installation:
- Install HashiCorp Vault on K8s-Admin-Box
- Configure Vault storage backend
- Initialize Vault and set up unseal keys
- Create secret paths for different environments:
- network/unifi
- network/mikrotik
- kubernetes/certificates
- kubernetes/tokens
- Store critical credentials:
- UniFi Controller credentials
- SSH keys for network devices
- MikroTik API credentials
- VPN certificates and keys
- Kubernetes sensitive configurations
- Set up Ansible Vault integration
- Configure automated credential rotation policies
- Vault Replication to Unraid:
- Create VM or container on Unraid (10.0.1.7) with IP 10.0.1.110
- Install Vault on Unraid VM/container
- Configure Performance Replication from primary Vault:
# On primary (K8s-Admin-Box) vault write -f sys/replication/performance/primary/enable vault write sys/replication/performance/primary/secondary-token id=unraid-backup # On secondary (Unraid VM/Container) vault write sys/replication/performance/secondary/enable token=<token-from-primary> - Configure automated health checks for replication status
- Set up periodic sealed backups of Vault data to off-site storage
- Primary Vault Installation:
-
Version Control & CI/CD Setup
- Initialize Git repository for network configurations
- Create branching strategy for changes:
- master (production)
- staging (testing)
- feature branches (development)
- Set up pre-commit hooks for validation
- Configure GitLab CI/CD pipeline for automated testing
- Create deployment workflows for network changes
-
Backup Infrastructure
- Configure automated backups for:
- Vault data
- Network device configurations
- UDM-PRO settings
- Ansible playbooks and inventory
- Set up off-site backup destination
- Implement backup testing and verification
- Configure automated backups for:
-
Phase 0 Verification
- Verify Ansible connectivity to all targeted devices
- Confirm Vault initialization and unsealing processes
- Test Vault replication to Unraid backup
- Validate backup and restore procedures
- Test Git workflow with sample configuration change
Phase 1: DHCP Reconfiguration
- Current DHCP Range: 10.0.1.200 - 10.0.1.250
- New DHCP Range: 10.0.1.200 - 10.0.1.220
- Infrastructure Range: 10.0.1.1 - 10.0.1.99 (static)
- Static Client Range: 10.0.1.221 - 10.0.1.254 (reserved)
Phase 1 Verification:
- Verify DHCP assignments are properly updated
- Test connectivity for existing clients
- Confirm static IP reservations are functioning
Phase 2: Core Infrastructure Configuration
-
Pre-Configuration Backup
- Create backup of UDM-PRO configuration
- Document current firewall rules and VLAN configurations
- Set restore point for Enterprise-24-PoE-Main switch
-
UDM-PRO Configuration (10.0.1.1)
- Create all VLANs (1, 2, 3, 4, 5, 6, 10, 16, 18, 28, 38, 48, 58)
- Define inter-VLAN routing policies
- Set up DHCP services for each VLAN
- Configure firewall rules for VLAN isolation:
- Allow 10.0.1.0/24 (Default) subnet access to K8s-Admin-Box (10.8.16.85)
- Allow 10.0.3.0/24 (Family) subnet access to K8s-Admin-Box (10.8.16.85)
- Implement appropriate ACLs for other inter-VLAN communication
- Add specific rules for vPro management traffic (10.8.16.190-191)
- Configure rules for Vault replication traffic between 10.0.1.223 and 10.0.1.110
- Enable routing between VLAN 1 and VLAN 16 for management
-
Enterprise-24-PoE-Main Switch (10.0.1.239)
- Assign static IP (confirm 10.0.1.239)
- Configure port 1 as trunk to UDM-PRO with all VLANs
- Configure port 24 as trunk to USW-Flex-2.5G-K8s-Main with K8s VLANs
- Configure remaining ports according to network diagram
Port Profiles Configuration:
- Create “All VLANs Trunk” profile: All VLANs tagged, VLAN 1 native, full PoE, 1Gbps
- Create “K8s Trunk” profile: VLANs 1, 16, 18, 28, 38, 48, 58 tagged, VLAN 1 native, auto-negotiate speed
- Create “AP Profile”: VLANs 1, 2, 3 tagged, VLAN 1 native, PoE enabled, 2.5Gbps
- Create “IoT Profile”: VLAN 2 native, no tagging, PoE enabled, 1Gbps
- Create “Family Profile”: VLAN 3 native, no tagging, PoE disabled, 1Gbps
- Create “Work Profile”: VLAN 4 native, no tagging, PoE disabled, 1Gbps
- Create “Security Profile”: VLAN 5 native, no tagging, PoE enabled, 1Gbps
- Create “Server Profile”: VLANs 1, 6, 10 tagged, VLAN 1 native, PoE disabled, 10Gbps
- Create “Management-AMT” profile: VLAN 16 native only, PoE disabled, 1Gbps
Phase 2 Verification:
- Verify VLAN creation and tagging on trunk ports
- Test inter-VLAN routing according to defined policies
- Validate firewall rules by testing connectivity between segments
- Confirm port profiles are correctly applied
- Document validation results
Phase 3: K8s Network Infrastructure Setup
-
Pre-Configuration Backup
- Backup configurations of USW-Flex-2.5-k8s-main and Use-flex-k8s-control
- Document connection matrix of existing devices
-
USW-Flex-2.5G-K8s-Main (10.0.1.80)
- Change IP from 10.0.1.215 to 10.0.1.80
- Configure port 1 as trunk to Enterprise-24-PoE-Main (all VLANs, native VLAN 1)
- Configure ports 2-3: K8s-MS-01-Node-1 (VLAN 16 native, VLAN 18 tagged)
- Configure ports 4-5: K8s-MS-01-Node-2 (VLAN 16 native, VLAN 18 tagged)
- Configure port 6: Trunk to USW-Flex-Mini-K8s-Control (VLAN 16 native, VLAN 18 tagged)
- Configure port 7: MikroTik-CRS309-K8s-Storage management (VLAN 1 only)
- Configure port 8: K8s-Admin-Box (VLAN 16 native, VLAN 18 tagged)
Port Profiles Configuration:
- Create “K8s-Main-Uplink” profile: All VLANs tagged, VLAN 1 native, 2.5Gbps
- Create “K8s-Management” profile: VLAN 16 native, VLAN 18 tagged, 2.5Gbps
- Create “K8s-Control-Mini-Uplink” profile: VLAN 16 native, VLAN 18 tagged, PoE enabled, 1Gbps
- Create “MikroTik-Management” profile: VLAN 1 only, 1Gbps
- Create “K8s-Admin” profile: VLAN 16 native, VLAN 18 tagged, 1Gbps
- Create “K8s-vPro” profile: VLAN 16 native only, 1Gbps
-
USW-Flex-Mini-K8s-Control (10.0.1.81)
- Change IP from 10.0.1.226 to 10.0.1.81
- Configure port 1: Uplink to USW-Flex-2.5G-K8s-Main (VLAN 16 native, VLAN 18 tagged)
- Configure port 2: K8s-CP-01 (VLAN 16 native, VLAN 18 tagged)
- Configure port 3: K8s-CP-02 (VLAN 16 native, VLAN 18 tagged)
- Configure port 4: K8s-CP-03 (VLAN 16 native, VLAN 18 tagged)
- Configure port 5: Spare
Port Profiles Configuration:
- Create “K8s-Control-Uplink” profile: VLAN 16 native, VLAN 18 tagged, 1Gbps
- Create “K8s-CP-Node” profile: VLAN 16 native, VLAN 18 tagged, PoE enabled, 1Gbps
-
MikroTik-CRS309-K8s-Storage (10.0.1.82)
- Set initial IP to 10.0.1.82
- Configure port 1: Management to USW-Flex-2.5G-K8s-Main (VLAN 1 only)
- Configure ports 2-3: K8s-MS-01-Node-1 SFP+ (VLANs 28, 38, 48 tagged)
- Configure ports 4-5: K8s-MS-01-Node-2 SFP+ (VLANs 28, 38, 48 tagged)
- Configure ports 6-8: Reserved for future expansion
MikroTik-Specific Configuration:
- Configure RouterOS with appropriate VLAN trunking:
/interface vlan add interface=sfp-sfpplus2 name=vlan28-pod vlan-id=28 /interface vlan add interface=sfp-sfpplus2 name=vlan38-service vlan-id=38 /interface vlan add interface=sfp-sfpplus2 name=vlan48-storage vlan-id=48 - Enable jumbo frames for storage network:
/interface ethernet set sfp-sfpplus2 mtu=9000 /interface ethernet set sfp-sfpplus3 mtu=9000 /interface ethernet set sfp-sfpplus4 mtu=9000 /interface ethernet set sfp-sfpplus5 mtu=9000 - Configure bridge interfaces as needed:
/interface bridge add name=bridge-storage protocol-mode=none
/interface bridge port add bridge=bridge-storage interface=vlan48-storage
Port Profiles Configuration:
- Create “MikroTik-Management-Port” profile: VLAN 1 only, no VLAN tagging, 1Gbps
- Create “K8s-Data-SFP” profile: VLANs 28, 38, 48 tagged, 10Gbps
- Create “Future-Expansion” profile: No configuration, disabled
Phase 3 Verification:
- Test connectivity between switch management interfaces
- Verify VLAN tagging on all configured ports
- Confirm MikroTik bridging and VLAN configuration
- Test jumbo frame capability on storage network
- Document network device MAC addresses and physical connections
Phase 4: Switch Management Standardization
-
Pre-Configuration Backup
- Create backups of all UniFi device configurations
- Document current port assignments and VLAN configurations
-
Access Switches & APs
- Convert all UniFi devices to static IPs:
- USW-Flex-Printer: 10.0.1.204
- U6-Enterprise-LivingArea: 10.0.1.207
- USW-Flex-Media: 10.0.1.208
- USW-Flex-SimRoom: 10.0.1.212
- U6-Enterprise-IW-Upstairs-Living: 10.0.1.227
- USW-Enterprise-8-PoE-Server: 10.0.1.238
- U6-Lite-Game: 10.0.1.242
Port Profiles Assignment:
- Assign appropriate profiles to access switches based on connected devices:
- For AP connections: “AP Profile”
- For IoT device connections: “IoT Profile”
- For family device connections: “Family Profile”
- For work device connections: “Work Profile”
- For security camera connections: “Security Profile”
- For server connections: “Server Profile”
- Convert all UniFi devices to static IPs:
Phase 4 Verification:
- Confirm all devices have proper static IP assignment
- Verify port profiles are correctly applied
- Test device connectivity on appropriate VLANs
- Validate AP SSID to VLAN mappings
Phase 5: K8s Node Configuration
-
Pre-Configuration Backup
- Create full system backups of all existing Kubernetes nodes
- Document current network configurations and service assignments
-
Admin Box Configuration
- Migrate k8s-admin (10.0.1.223) to:
- Management: 10.8.16.85/27 (VLAN 16)
- Control Plane access: 10.8.18.85/27 (VLAN 18)
- Update network configuration files for new IP addressing
- Test Vault operation with new network configuration
- Migrate k8s-admin (10.0.1.223) to:
-
Control Plane Setup
- Migrate existing k8s-cp-02 (10.0.1.229) to new IPs:
- Management: 10.8.16.87
- Control Plane: 10.8.18.87
- Migrate existing k8s-cp-03 (10.0.1.245) to new IPs:
- Management: 10.8.16.88
- Control Plane: 10.8.18.88
- Configure new K8s-CP-01:
- Management: 10.8.16.86
- Control Plane: 10.8.18.86
- Update etcd peer addresses and API server configurations
- Migrate existing k8s-cp-02 (10.0.1.229) to new IPs:
-
Worker Node Setup
- Configure K8s-MS-01-Node-1:
- Management: 10.8.16.90/27 (VLAN 16)
- Control Plane: 10.8.18.90/27 (VLAN 18)
- Pod Network: 10.8.28.90/23 (VLAN 28)
- Service Network: 10.8.38.90/26 (VLAN 38)
- Storage Network: 10.8.48.90/27 (VLAN 48)
- vPro Management: 10.8.16.190 (VLAN 16)
- Configure K8s-MS-01-Node-2:
- Management: 10.8.16.91/27 (VLAN 16)
- Control Plane: 10.8.18.91/27 (VLAN 18)
- Pod Network: 10.8.28.91/23 (VLAN 28)
- Service Network: 10.8.38.91/26 (VLAN 38)
- Storage Network: 10.8.48.91/27 (VLAN 48)
- vPro Management: 10.8.16.191 (VLAN 16)
- Configure K8s-MS-01-Node-1:
-
Intel vPro Configuration
- Configure Intel AMT on worker nodes:
- K8s-MS-01-Node-1: Enable AMT and assign 10.8.16.190
- K8s-MS-01-Node-2: Enable AMT and assign 10.8.16.191
- Set admin credentials in Vault
- Configure network access policies and security settings
- Test remote management capabilities
- Configure Intel AMT on worker nodes:
Phase 5 Verification:
- Test control plane connectivity
- Verify worker node communication on all network segments
- Validate Intel vPro/AMT configurations
- Test API server access from management network
- Verify Kubernetes service discovery across new network segments
4. Transition Planning
-
Service Migration Strategy
- Document all running services and dependencies
- Create downtime schedule for each component
- Develop rollback procedures for each step
- Define success criteria for each migration
-
Maintenance Windows
- Schedule Phase 1-2: [Date], [Time] (estimated 2 hours)
- Schedule Phase 3: [Date], [Time] (estimated 3 hours)
- Schedule Phase 4: [Date], [Time] (estimated 2 hours)
- Schedule Phase 5: [Date], [Time] (estimated 4 hours)
-
Component Transition Order
- Network infrastructure first (switches, routers)
- Control plane nodes (one at a time)
- Worker nodes
- Service reconfiguration
-
Post-Migration Verification
- Define test cases for each critical service
- Verify external connectivity
- Validate internal service discovery
- Confirm backup systems are functioning
5. Verification & Testing
-
Network Connectivity Tests
- Verify trunk configurations with
tcpdumpon each VLAN - Test routing between allowed VLANs
- Validate VLAN isolation for security
- Verify jumbo frame support on storage network
- Test vPro management interface connectivity
- Verify trunk configurations with
-
Kubernetes Functionality Tests
- Test control plane HA configuration
- Verify pod networking across nodes
- Validate service discovery
- Test storage network performance
- Confirm external connectivity via load balancer network
- Verify Vault access from cluster nodes
- Test remote management via Intel AMT
6. Backup & Rollback Procedures
-
Backup Methodology
- Create full device configuration backups before each change
- Maintain version-controlled configuration files in Git
- Document physical port connections with photos/diagrams
-
Rollback Procedures
- Network Device Rollback:
- Documented procedure for restoring switch configs via controller
- CLI-based restoration for MikroTik devices
- Kubernetes Node Rollback:
- System state restoration procedure
- Network configuration reset process
- Service Restoration:
- Documented process for each critical service
- Data persistence verification steps
- Network Device Rollback:
-
Testing Recovery Procedures
- Schedule periodic recovery drills
- Verify backup integrity
- Document recovery time objectives (RTOs)
7. Documentation
-
Network Documentation
- Complete IP address inventory
- VLAN assignments
- Switch port configurations
- Physical and logical network diagrams
- Port profile definitions and assignments
- vPro management interfaces and access procedures
- Vault replication configuration and management
-
Kubernetes Configuration
- Node inventory
- Network configurations per node
- Service subnet allocations
- HA configuration details
- Detailed MikroTik configuration for storage network
- Recovery and rollback procedures
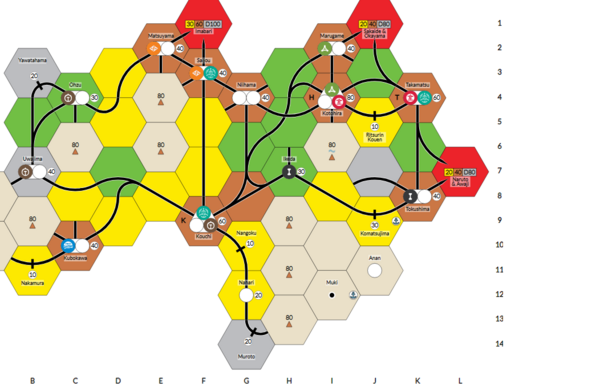
Updated Planned Final Network Diagram
Network Diagram (SVG)
Download/view the SVG version of the network diagram
Homelab Scripts & Documentation
All scripts, documentation, and ongoing updates for this homelab project will be maintained in a dedicated repository:
https://github.com/stoutpanda/homelab
Check there for the latest scripts, guides, and notes as the build progresses.